 Pin It
 I still remember the December afternoon when my grandmother taught me to build a gingerbread house frame for the first time. Her kitchen smelled like cinnamon and molasses, and she guided my hands as we pressed warm gingerbread pieces together with royal icing, telling me stories about holiday traditions she'd carried from her own childhood. That day, I realized this wasn't just about creating a dessert—it was about building something beautiful that would become the centerpiece of our table, a memory we'd all gather around.
The first time I made this for a holiday dinner party, I was nervous about whether it would hold up. But as my guests arrived and saw this warm-toned gingerbread frame sitting proudly in the center of the table, their eyes lit up. They didn't want to eat it at first—they just wanted to admire it and take photos. That's when I knew I'd created something special, something that bridged the gap between art and food in the most delightful way.
Ingredients
- All-purpose flour (300 g): This is your foundation, and it needs to be measured correctly—too much flour makes the gingerbread tough and dry. I learned to spoon flour into my measuring cup and level it off rather than scooping directly from the bag.
- Brown sugar (100 g): The color and subtle molasses notes make all the difference. Don't skip it for white sugar, or you'll lose that warm, deep flavor that makes gingerbread irresistible.
- Unsalted butter (100 g), softened: Room temperature butter creams beautifully and incorporates air into the dough. Cold butter won't do the job. Leave it on the counter for about an hour before you start.
- Molasses or dark honey (100 g): This is where the magic happens. Molasses gives that dark, rich color and depth of flavor that makes people say, 'What's that amazing flavor?' Use unsulfured molasses if you can find it, and don't substitute with regular honey—the flavor won't be the same.
- Egg (1 large): This binds everything together and helps the dough hold its shape during baking. Make sure it's at room temperature so it mixes smoothly.
- Ground ginger (1 tsp): Fresh is always better. If you have fresh ginger, finely grate about a tablespoon and use it alongside the ground version for a brighter spice note.
- Ground cinnamon (1 tsp): Use the highest quality you can find—it makes a surprising difference in the final flavor. I buy mine from specialty spice shops because it tastes noticeably warmer and more complex.
- Ground cloves (1/2 tsp): A little goes a long way with cloves. This small amount provides that mysterious holiday warmth without overpowering the other spices.
- Baking soda (1/2 tsp): This helps the dough rise slightly and gives the gingerbread a tender crumb. It also reacts with the acidic molasses, which is why they work together so well.
- Salt (1/4 tsp): Never skip salt, even in sweet recipes. It enhances all the warm spices and balances the sweetness.
- Egg white (1): For the royal icing, make sure it's at room temperature and completely free of any yolk, or the icing won't reach stiff peaks.
- Powdered sugar (200 g), sifted: Sifting removes lumps and creates silky icing. Trust me on this—lumpy icing won't pipe smoothly or create that beautiful glossy finish.
- Lemon juice (1/2 tsp): Just a splash, but it adds brightness and helps stabilize the icing so it sets properly as a structural glue.
- White chocolate (50 g), melted: This adds delicate white drizzles that contrast beautifully against the brown gingerbread. Melt it gently over low heat or in short bursts in the microwave so it doesn't seize.
- Assorted candies: White and brown candies create a unified, elegant look. Chocolate buttons, pearl sprinkles, and mini marshmallows are my go-to choices, but let your imagination guide you.
Tired of Takeout? 🥡
Get 10 meals you can make faster than delivery arrives. Seriously.
One email. No spam. Unsubscribe anytime.
Instructions
- Cream the foundation:
- In a large bowl, beat the softened butter and brown sugar together for about 2 minutes. You're looking for a light, fluffy mixture that's pale and airy. This is where the magic starts—all that air you're incorporating will make your gingerbread tender and wonderful.
- Add your wet ingredients:
- Add the egg and molasses, mixing for about a minute until everything is combined and looks smooth. The mixture might look a bit separated at first, but keep mixing and it will come together beautifully. Stop and scrape down the sides of the bowl occasionally.
- Whisk your dry mixture:
- In a separate bowl, whisk together the flour, ginger, cinnamon, cloves, baking soda, and salt. This whisking is important—it distributes the spices evenly so every bite tastes balanced and warm.
- Bring it together gently:
- Gradually add the dry ingredients to the wet mixture, stirring slowly until a smooth dough forms. Don't overmix or you'll develop too much gluten and end up with tough gingerbread. Mix just until there are no visible streaks of flour.
- Chill with patience:
- Wrap the dough in plastic wrap and refrigerate for at least 30 minutes. I often chill mine overnight because cold dough is much easier to roll out and holds its shape better during baking. This step is worth the wait.
- Get your oven ready:
- Preheat to 350°F (180°C) and line a baking sheet with parchment paper. A hot oven ensures your gingerbread bakes evenly and the edges set properly while the inside stays tender.
- Roll with confidence:
- On a lightly floured surface, roll your dough to about 1/4 inch thickness. Work slowly and turn the dough occasionally so it rolls evenly. Using templates (a knife and cardboard pattern work fine) cut out your house panels—front, back, two sides, and roof pieces, each about 4 to 5 inches per side. A ruler and sharp knife give the cleanest cuts.
- Bake until just set:
- Place the pieces on your prepared baking sheet and bake for 10 to 12 minutes. You're looking for the edges to feel firm but the centers to still be slightly soft. They'll continue to set as they cool. Don't overbake or they'll be too brittle to assemble.
- Cool completely:
- Transfer each piece to a wire cooling rack and let them sit until completely cooled. This usually takes about 15 to 20 minutes. Warm gingerbread is too fragile to handle, so patience here pays off.
- Make your royal icing glue:
- In a clean bowl, beat the room-temperature egg white until soft peaks form. Gradually add the sifted powdered sugar a bit at a time, beating continuously. Once the sugar is incorporated, add the lemon juice and beat until thick, glossy, and spreadable. This royal icing acts as your structural glue, so it needs to be stiff enough to hold weight but spreadable enough to work with.
- Assemble with care:
- Pipe or spread royal icing along the edges of your gingerbread panels. Press the front panel and back panel together with one side panel, holding each joint for about 30 seconds while the icing starts to set. Add the other side, and finally the roof. This is like building a delicate edible house—go slowly and let each connection set briefly before moving on. Let the assembled frame sit for at least 30 minutes, preferably longer, until the icing is completely hard and the structure is stable.
- Decorate with joy:
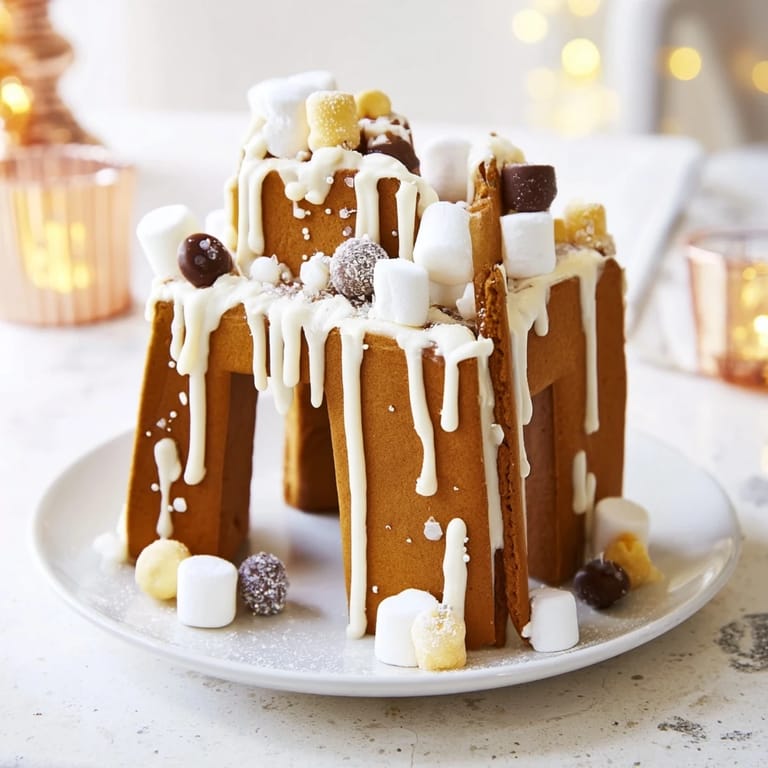
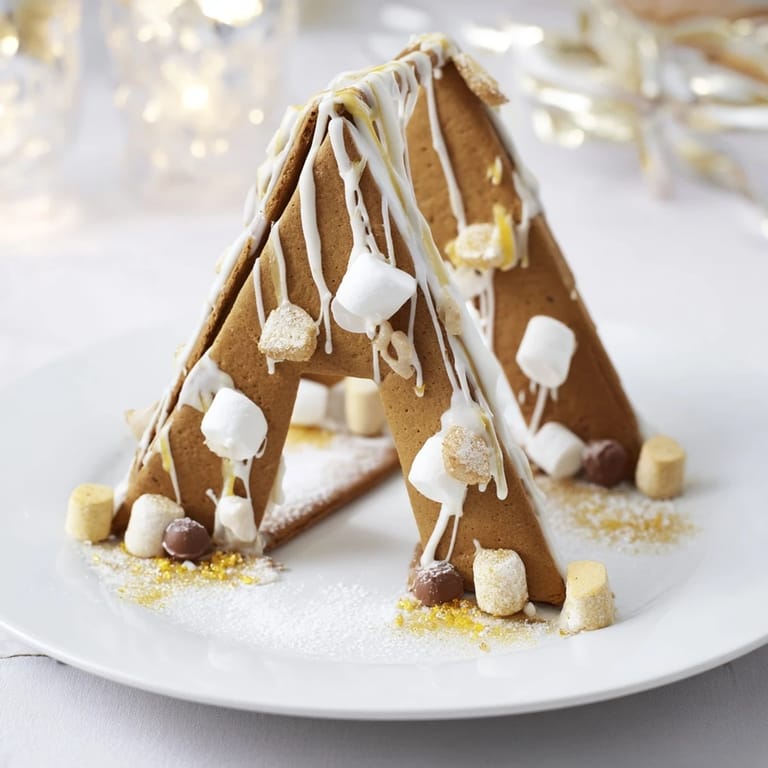
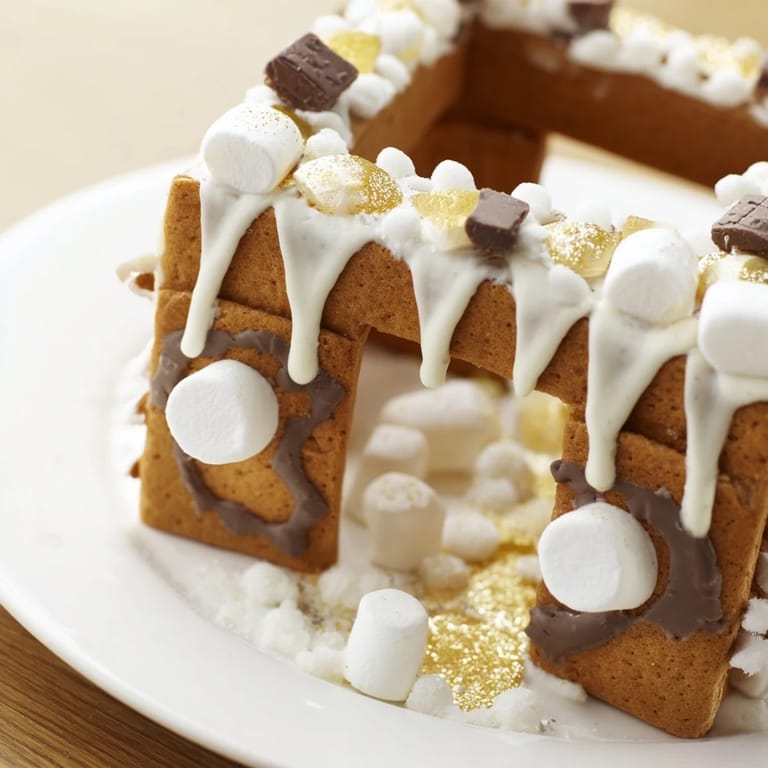
- Once the structure is solid, pipe white chocolate drizzles and stick on your candies using royal icing as adhesive. This is the fun part where you create your own design. Work with a light touch and let your creativity shine. Dust with edible glitter if you'd like some extra sparkle.
- Complete your display:
- Place your finished gingerbread house frame on a large platter. Arrange additional holiday cookies, nuts, chocolate pieces, or treats around the inside and outside of the frame to create a gorgeous festive border. Step back and admire your work.
 Pin It
 Last year, my daughter helped me decorate the gingerbread frame, and she carefully placed each candy like she was creating edible art. As we worked together, I watched her understand that food isn't just about eating—it's about creating something beautiful to share. That frame sat in the center of our holiday table for a whole week, and everyone who came through our door asked about it. Some traditions start with recipes, but the best ones start with moments like that.
Making Your House Extra Special
The beauty of a gingerbread house frame is that it's as much about creativity as it is about technique. I've experimented with different decorating styles over the years, and I've learned that the most striking designs use a cohesive color scheme. I love sticking with white and cream candies against the deep brown gingerbread because it looks sophisticated and timeless. If you prefer a more colorful look, choose candies in one or two accent colors—maybe deep reds or forest greens—rather than a rainbow effect. The key is letting your gingerbread frame be the star while the decorations complement it rather than compete with it. I often step back and look at my design from across the room to see how it reads from a distance.
Troubleshooting and Storage
I've made this recipe enough times to know what can go wrong, and I've learned solutions for each issue. If your gingerbread panels crack during assembly, don't despair—you can often carefully attach them with extra royal icing and prop them with small supports until they set. If your house feels wobbly, you might need to let the icing cure longer or apply more icing to the joints. Once your frame is completely assembled and decorated, it will keep for up to two weeks in a cool, dry place (not the refrigerator, which introduces moisture). Cover it loosely with a box or paper tent to protect it from dust. If you're making this ahead, I recommend baking the panels a day or two early and storing them in an airtight container. This actually makes assembly easier because cold panels are sturdier than warm ones.
Why This Frame Works as a Centerpiece
What I love most about this gingerbread house frame is its versatility. Unlike a closed gingerbread house that's meant to be admired and eventually broken open, this frame has an open center that's perfect for displaying other treats. I fill mine with an assortment of holiday cookies, homemade fudge, candied nuts, and chocolate truffles. It becomes a edible platter that's equal parts decoration and dessert. Your guests can serve themselves treats from the center while admiring the frame itself. It's a conversation starter that also functions beautifully on your table. Every holiday season, my frame gets photographed for holiday cards and social media—it's just that stunning. And the best part is that once the holidays are over, you can carefully disassemble it and eat every piece. Nothing goes to waste.
- Make the frame one or two days ahead to reduce holiday cooking stress on the day of your gathering.
- Pair it with hot chocolate, mulled wine, or spiced cider for a complete holiday experience.
- If you're nervous about assembly, do a practice run with the templates before committing to the real thing.
 Pin It
 Every time I build this gingerbread house frame, I'm reminded that the best holiday traditions aren't about perfection—they're about creating something with intention and sharing it with people you love. This frame brings that warmth to your table.
Recipe FAQs
- → How do I ensure the panels stay sturdy during assembly?
Chill the dough before rolling, and bake panels until edges are firm but not overly hard. Use thick royal icing to securely attach the pieces and allow sufficient drying time.
- → Can I use an alternative to molasses in the dough?
Dark honey works well as a substitute, maintaining the rich flavor and moist texture of the gingerbread.
- → How can I add color variation to the gingerbread panels?
Adding cocoa powder to the dough introduces a deeper brown tone, complementing the classic spices.
- → What decorations work best for the gingerbread frame?
White chocolate drizzles, assorted white and brown candies, sprinkles, and edible glitter create a festive and inviting look.
- → Are there alternatives to royal icing for assembly?
You can use vegan-friendly icings or edible glue substitutes to accommodate dietary preferences without compromising stability.