 Pin It
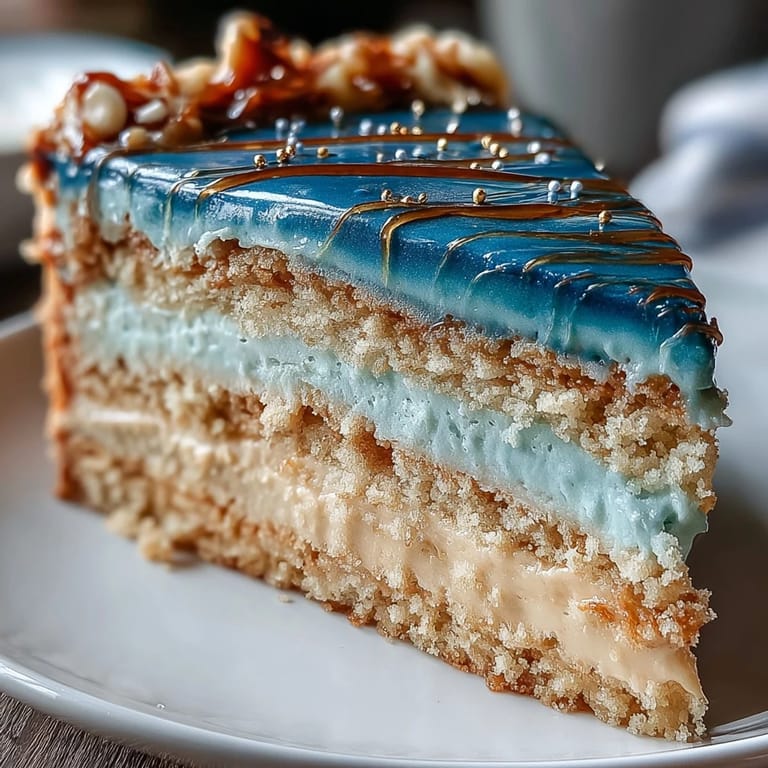
 You know that charge of excitement that pulses through the kitchen on a milestone day? The first time I made this Graduation Cake for my cousin's big celebration, the house was filled with nervous chatter and the occasional burst of laughter. There was something about mixing those blue ombre batters that made the whole moment feel both grand and oddly playful—especially when I nearly dropped one pan and caught it mid-air. The scent of vanilla and fresh cake drifted toward the living room, drawing a crowd before I'd even finished decorating. It's a cake that looks as dramatic as the occasion deserves: deep blues, gleaming gold, and an air of accomplishment.
Last spring, I baked this cake for my brother's graduation from engineering school—and the whole family argued playfully over who got which shade of blue. Nobody could resist sneaking a fingerful of buttercream while I tried piping on gold streaks. The moment I sliced the cake and revealed those gradients, he grinned and said it looked like his college colors, which was a total bonus.
Ingredients
- All-purpose flour: Ensures structure for tall layers; sift for an airy crumb.
- Baking powder: Gives proper rise so the cake doesn't feel dense.
- Baking soda: Just a touch balances the acidity and makes the crumb tender.
- Salt: Brings out the vanilla and tempers sweetness—don't skip it.
- Unsalted butter, room temperature: Creamy and rich—let it soften fully for effortless mixing.
- Granulated sugar: Sweetens and helps after beating for fluffiness.
- Eggs, room temperature: Bind everything together and give lift; set them out early.
- Pure vanilla extract: Adds warmth to both cake and buttercream.
- Whole milk, room temperature: Keeps layers moist, and helps achieve uniform texture.
- Blue gel food coloring (navy, royal, light): True gel colors stay vibrant and won't thin the batter—go slowly when mixing.
- Powdered sugar, sifted: Prevents lumpy buttercream and achieves that glossy finish.
- Milk or cream: Adjusts buttercream texture—cream makes it extra silky.
- Dark blue gel food coloring: The dramatic final touch for that ombre effect.
- Edible gold leaf or gold dust: For those elegant streaks. Gold dust mixes smoothly for neat brushwork.
- Clear alcohol (vodka/lemon extract): Helps gold dust adhere nicely—use sparingly.
Tired of Takeout? 🥡
Get 10 meals you can make faster than delivery arrives. Seriously.
One email. No spam. Unsubscribe anytime.
Instructions
- Prepare cake pans and preheat:
- Grease and line your three pans with parchment, then preheat the oven so everything's ready when the batter comes together.
- Mix dry ingredients:
- Whisk flour, baking powder, baking soda, and salt until even; the kitchen always smells a bit nutty when flour hits the bowl.
- Cream butter and sugar:
- Beat together until pale and fluffy—listen for the mixer's steady rhythm and watch for the mixture lightening in color.
- Add eggs and vanilla:
- Drop in eggs one at a time, scraping down as needed; the batter gets glossy and thick, changing texture with each addition.
- Combine wet and dry:
- Alternate flour and milk, blending gently; stop mixing once you see the batter look smooth, so your cake stays tender.
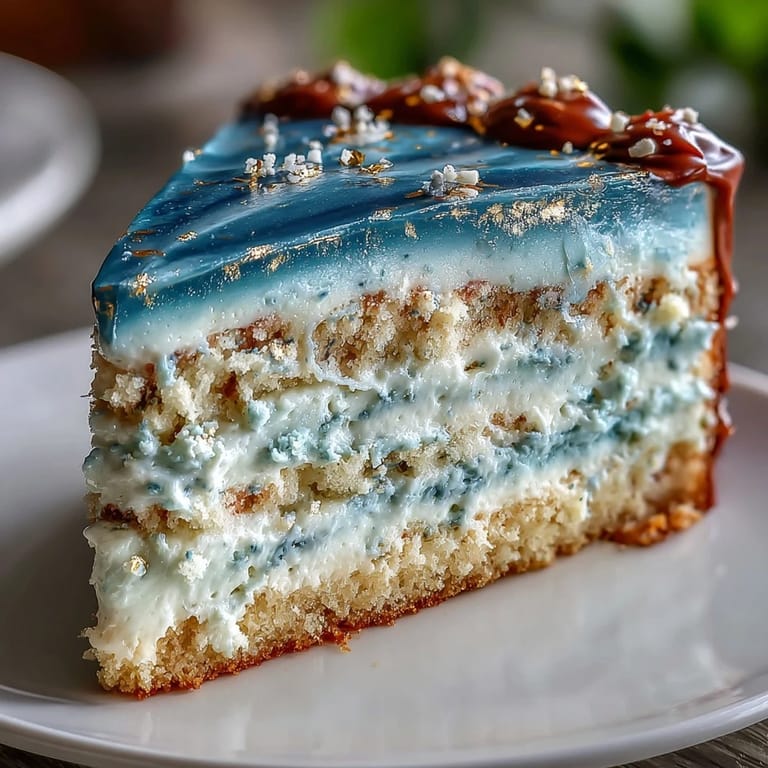
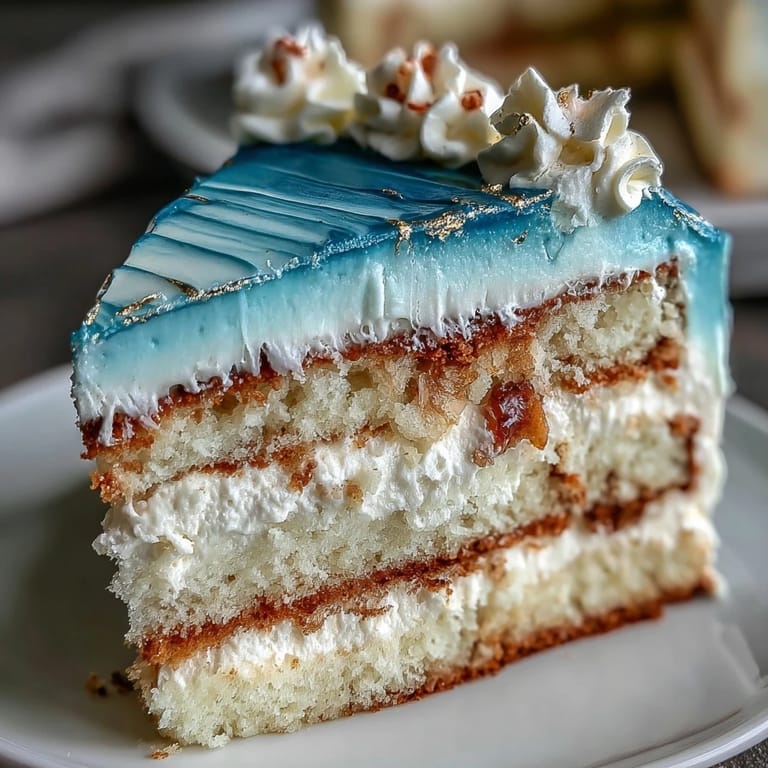
- Tint and layer batters:
- Divide into three bowls and tint to gradient blues—go slow with gel colors until you get that bold ombre effect.
- Bake and cool layers:
- Pour each color into a pan, smooth, and bake; your kitchen fills with vanilla and anticipation. Cool 10 minutes in pans, then let them fully cool on racks.
- Prep vanilla buttercream:
- Beat butter until creamy, then sift in powdered sugar and add vanilla—let the mixer run until it's lush and light.
- Tint buttercream:
- Reserve a cup for crumb coating. Tint the rest dark blue for your ombre finish.
- Assemble layers:
- Level cakes if needed, stack darkest to lightest, spreading buttercream between; it's oddly satisfying lining each up neatly.
- Apply crumb coat:
- Smooth a thin coat, chill twenty minutes for easy final frosting—the cake chills while you plan your next decoration.
- Frost ombre and decorate:
- Finish with blue buttercream; blend in lighter shades at the top for that ombre look. Brush or press gold leaf or dust on for accents.
- Chill and serve:
- Let the sparkle set in the fridge and serve with a flourish. The cake holds its shape—slices beautifully reveal those blue layers.
 Pin It
 On the day my nephew graduated, everybody gathered around the kitchen counter, hands eager, waiting for that first slice. The kitchen felt electric, and suddenly the ombre cake became more than dessert—it was the centerpiece that sparked toasts, laughter, and a feeling of new beginnings.
Make Your Ombre Shine
If you're new to ombre cakes, blending two buttercream shades on your spatula and swirling gently gives a natural gradient. The trick is not to overwork the colors or they muddle—just press, sweep, and step back to admire the effect before adding gold accents.
Gold Accents without Fuss
If edible gold leaf feels intimidating, gold dust is an easier alternative that gives gorgeous shine. Just mix with a drop of vodka or lemon extract and brush it on edges or streaks—even imperfect lines look purposeful when paired with dramatic blues.
How to Keep Your Cake Looking Fresh
Cakes with vibrant colors and gold need to chill until serving—but don't leave them uncovered or they dry out. Once decorated, cover loosely with plastic wrap or a cake dome, and if using gold leaf, avoid touching it directly.
- The ombre effect holds best when you frost in a cool kitchen.
- Refrigerate leftovers promptly—the buttercream stays velvety for days.
- Let guests admire the layers before slicing—it's worth the suspense.
 Pin It
 Serving a blue-and-gold graduation cake guarantees a moment everyone treasures—even after the plates are cleared, the memory hangs around. May every milestone feel just as glittering and sweet.
Recipe FAQs
- → How do I achieve the blue ombre layers?
Divide batter into three bowls and tint each with varying shades of blue gel food coloring to create a gradient.
- → What is the best gold decoration for the cake?
Use edible gold leaf for bold accents or edible gold dust mixed with clear alcohol for delicate streaks and edges.
- → Can I prepare the cake layers ahead of time?
Yes, bake cake layers in advance and store tightly wrapped at room temperature for up to a day before assembling.
- → How do I make buttercream smooth for finishing?
Beat butter thoroughly, gradually add powdered sugar, and adjust with milk or cream to reach a spreadable, smooth consistency.
- → Are the gold decorations safe to eat?
Ensure all gold leaf or dust used is labeled as edible and suitable for cake decorating—always check packaging details.
- → Can I use more ombre layers for effect?
Yes, for added drama, divide batter into four or five shades, increasing blue intensity for a pronounced gradient.